Sunday, February 27, 2011

This Week's Dinner Menu


I've made Taco Soup several times before. It's amazing, you should try it. It's a great meal to bust out when you have to feed a bunch of people because it's simple to make. 


I'm excited to try out the twice-baked taco potatoes recipe that my mother sent me. The rest of the dishes this week are casseroles in my freezer that I never got around to eating last week.


What do you think? Comments? Suggestions? I would love to know that you visited my blog. Please leave me a message letting me know you were here! Did you try out a recipe? Let me know! I would love to hear from you :-)

Cheesy Onion Burgers (Veggie Or Not)


I have some Boca burger patties in my freezer that I wanted to find creative ways to cook with. I was looking up some recipes and found this simple burger recipe. My husband thinks boca burgers taste like cardboard and sometimes I have to agree. So I knew I wouldn't be able to make him boca burgers for dinner and get away from it. Luckily, our friends Jessie & Doug had brought us some fresh ground beef from their "shared" cow. (Yes, only in Lancaster County). I had this whole master plan of making a veggie burger for me and a regular burger for Gerald. But when I saw how good his burger turned out I scrapped that idea and made a real burger. They were delicious!!! Such good ground beef. (Big thanks to The Smokers!) I think in the near future when I want to be healthier I will try out this recipe for real, but for now the non-veggie burger is too delicious to pass up.


Ingredients:
3/4 cup diced sweet onion
1 tblsp of butter or margarine
1/2 teaspoon caraway seeds
2 Morningstar Farms veggie burgers, or 1/2 lb. ground beef made into meat patties
2 oz. thinly sliced Gruyere cheese or some alternative
Arnold thin's for hamburger bins.


I was recently introduced to gruyere cheese at cooking club last week. My friend Tara, made this great tomato bisque soup and put it on the top. I was looking for some at Darrenkamps and they only had this really expensive kind. They suggested using another imported Swiss close the flavor. Luckily the folks behind the Deli counter at D-Kamp's were knowledgeable enough to pick out the right kind for me.


Directions:
Heat butter in saucepan on medium-low heat.
Saute onions on hot butter, stirring occasionally, for about 10 minutes.
Meanwhile, form beef into patties and cook in saucepan (or use the grill if the weather will allow it) using non-stick pray. Brown one side, flip, and cook/brown the other side.
Once cooked through (I don't like my burgers pink at all - just like my daddy!), top with cheese, cover with lid to help the cheese melt faster.
When cheese is melted, remove lid, top with onions, and place on a toasted bun or use Arnold's-brand Sandwich thins.
Serve with a side of steamed veggies.


What do you think? Comments? Suggestions? I would love to know that you visited my blog. Please leave me a message letting me know you were here! Did you try out a recipe? Let me know! I would love to hear from you :-)

Saturday, February 26, 2011

Egg McMuffins (at home)

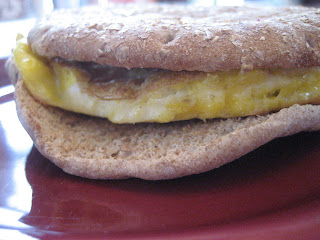
We had a 2-hour delay (again) this week. Luckily school wasn't closed completely otherwise we would have to take a day back from our Easter Break. I can't believe we are still getting snow, but at least I'm taking advantage of it. Normally I just have a bowl of cereal for breakfast or a fiber bar as I'm running out the door. Sometimes I wait to eat breakfast at work before the kids show up for homeroom. It's nice having a 2 hour delay and being able to take my time. Gerald was outside shoveling the driveway and warming up my car (he's awesome!) so I thought I'd make us both breakfast. Turned out great! The recipe below is for one sandwich. 

Ingredients:
1 egg
1 egg white
tiny onion
1/4 of a bell pepper
1 tbsp bacon bits
1 whole grain sandwich thin, preferably Arnold's
1 clove of minced garlic or 1/2 tsp garlic powder (optional)
1/2 tsp of butter (optional)
non-stick cooking spray
1 circular can of peanuts or something else that fits a sandwich thing


Directions:
Use a non-stick pan or spray a medium-sized pan with olive oil cooking spray over medium heat.
Whisk egg, egg white, peppers, and bacon bits together in a small bowl.
Place circular can on pan and poor egg mixture inside.
You may have to hold the can down tight so that the egg mixture won't leak out from underneath (at least for a little while) but it might actually hold on it's own.
Let it cook for about a minute or two, once the egg mixture firms up, you'll notice that it'll hold on it's own and you can lift up the can.
Flip over the egg and cook the other side.
Meanwhile, toast an Arnold's sandwich, spread sides with just a lil' bit of butter and top with garlic powder or actual minced garlic.
Place egg on bread top with ketchup or hot sauce or nothing at all.
ENJOY!!!


This recipe was inspired by Roni from GreenLiteBites. What a genius idea! She has some amazing dishes on her site. The Mexican pizza I made the other night was from her site. Also the peppers stuffed with quinoa was from her. You should check her stuff out it's delicious and you can feel good about yourself when you try out those healthy recipes.

What do you think? Comments? Suggestions? I would love to know that you visited my blog. Please leave me a message letting me know you were here! Did you try out a recipe? Let me know! I would love to hear from you :-)

Monday, February 21, 2011

Italian Hoagie Dip

OH MY GOSH THIS IS SOOOOOOOOOOOO GOOD!!!

Special thanks to my friends Jess & Drew for introducing this to me, I think it might have changed my life. Amazing Amazing.


Our friend Mike turned 30 this weekend and I decided to bring this to his birthday party.


I'll warn you, this dip is addicting. It tastes JUST like your are eating an Italian Sub, it's kind of cool.


Ingredients:
1/2 lb hot ham capicola, thinly sliced
1/2 lb genoa salami, thinly sliced
1/3 lb pepperoni slices
1/2 lb white american cheese, thinly sliced
1 small onion, chopped
2 tbsp italian seasoning
1 cup reduced fat mayo
1 tomato, diced
1/4 cup diced celery (optional, I had some already chopped in my fridge)
1/2 head iceberg lettuce, finely shredded
salt & pepper to taste


Directions:
Lay out meats & cheese on a large cutting board.
Cut up all the meat and cheese in one direction, then do it again in the opposite direction (see pictures)
Place in large bowl and mix in onion, italian seasoning, mayo, and salt & pepper.
Put in fridge to keep cool.
Cut up lettuce & tomato and add to bowl right before serving.
Serve with slices of french baquete, crusty bread, or flip side pretzel crackers (see pictures)
Add additional italian seasoning or salt & pepper, if desired.


What do you think? Comments? Suggestions? I would love to know that you visited my blog. Please leave me a message letting me know you were here! Did you try out a recipe? Let me know! I would love to hear from you :-)


Sunday, February 20, 2011

This Week's Dinner Menu


I know what you are thinking...she is obsessed with casseroles. Guilty. I can't help it, a lot of these meals, are waiting for me in the freezer and I used my Freezer Pleasers book or some other resource to find a freezer-friendly recipe. I've noticed that casseroles are one of the most freezer-friendly meals out there. Hence, why I have so many casseroles in my freezer.


I already have the Creamy Chicken & Noodles recipe posted, along with the Mediterranean Tuna Casserole


Look for the rest of them sometime next week.


ENJOY!


What do you think? Comments? Suggestions? I would love to know that you visited my blog. Please leave me a message letting me know you were here! Did you try out a recipe? Let me know! I would love to hear from you :-)

Mexican Pizza

We had a late night at our house on Saturday night. We came back from a birthday party and a bunch of us stayed up eating, talking, and watching EPIC meal videos on You Tube. (You think I should make one of those meals for my blog???)

I knew the boys were starting to get restless (and devouring all of my puppy chow) so I had to make something for everyone to eat for dinner. I had this mexican pizza recipe that I wanted to try out, so I went for it.


Check out Green Lite Bites for other cool recipes. My recipe below is modified from the original recipe, but it turned out great and the boys enjoyed it. 


Ingredients:
1 container of Pillsbury dough pizza crust
1/4 cup of Goya-brand cooking base cilantro (or enough to cover the pizza) or you can use dried cilantro (see picture)
1 can of fat-free refried beans
2 cans of diced tomatoes with green chiles or salsa, drained
1 red bell pepper, chopped
1.5 to 2 cups of mexican-style cheese, shredded (or whatever other cheese you have)
chili powder and/or taco seasoning


Directions:
Preheat oven to 400 degrees
Spray a rimmed cookie sheet with olive oil spray
Open and unravel pizza crust, lay on the cookie sheet
Spread refried beans evenly on crust with spatula
Do the same with the cilantro
Top with tomatoes & peppers
Sprinkle with a little bit of chili powder or taco seasoning
Top with cheese
Cook in oven for about 20 minutes, maybe longer. You want to make sure the crust is crispy all the way around and cheese is melted.


What do you think? Comments? Suggestions? I would love to know that you visited my blog. Please leave me a message letting me know you were here! Did you try out a recipe? Let me know! I would love to hear from you :-)


Saturday, February 19, 2011

Eat Later Pizza

If you are thinking of a simple, easy, and cheap way to stock up your freezer then why not make your own frozen pizza?


I just tried this for the first time recently and was so glad I did. I fyou are having a busy week and don't have time to cook you could buy frozen pizzas from the store or you could just stock up on your own to have for those future busy nights.


Have you heard of Pillsbury Seamless Dough? It serves as a great pizza crust and comes out in a perfect rectangle. (see above)


I didn't get any pictures of the final product, but it was great. You'll just have to trust me. :-)


Ingredients:
1 8 oz container of Pillsbury seamless dough
1 cup pizza sauce
1/3 cup reduced fat parmesan cheese
1.5 cups reduced fat mozzarella cheese, shredded
15 - 20 pieces of turkey pepperoni


Directions:
Cover a cookie sheet with tin foil.
Open container of dough, unroll and spread over cookie sheet.
Spread pizza sauce, then cheeses, then pepperonis on top.
Cover tin foil over the entire sheet.
Freeze for later.
When you are ready to use, unwrap foil and bake at 350 degrees for 25 to 30 minutes.


I would love to know that you visited my blog or tried out a recipe. Leave me some love & encouragement!

Broccoli Chicken

Easiest recipe ever! Here is a nice low fat dish to make when you have an extra few minutes. Then freeze it for later.


Ingredients:
3/4 lb chicken breasts (boneless & skinless)
1 14 oz can of cream of chicken soup
2 cups frozen broccoli cuts
1/2 cup white wine (i didn't have any open, so I used red, of course!)
1 tsp pepper
1 tsp paprika


Mix soup, broccoli, wine, pepper, & paprika in a medium size bowl.
Place chicken on the bottom of a freezer container or casserole dish. 
Cover chicken with soup mixture.
Cover with foil & freeze no longer than 1 month.
When ready to eat, thaw in fridge over night. 
Bake, covered, in preheated 350 degree oven for one hour.


I would love to know that you visited my blog or tried out a recipe. Leave me some love & encouragement!

Chicken Stuffing Casserole


I have A LOT of friends who've had babies lately. I've been making lots of dinners to bring to them and here is a great one to try out. Easy to make, freeze, and then serve later.


Can you guess where I got this recipe from???


The original recipe calls fro lots of mushrooms and mushroom soup, but I want nothing to do with mushrooms so I left that out. You can add them in, your choice. 


Ingredients:
2 packages (6 oz) chicken stuffing mix
butter for stuffing mix
1 can of cream of celery or cream of chicken soup
1 cup milk
3 cups of cubed chicken, cooked
2 cups frozen corn or frozen mixed vegetables (with corn)
2 cups of shredded cheddar cheese


Directions:
Prepare stuffing according to directions.
Meanwhile, in a large bowl, combine soup and milk, set aside.
Spread the stuffing into two greased 8-in. square baking dishes.
Layer with the cooked chicken, corn, soup mixture, and cheese.
You can cook now or freeze for later.


If you choose to cook immediately...
Cover and bake at 350 degrees for 30 to 40 minutes or until cheese is melted.


If you choose to freeze for later...
Cover and freeze for up to 3 months.
Remove from freezer 30 minutes before baking.
Cover and bake at 350 for 60 to 90 minutes.
Uncover and bake for an additional 10 to 15 minutes.


I would love to know that you visited my blog or tried out a recipe. Leave me some love & encouragement!

Friday, February 18, 2011

Cake Pops (Owls)


SO SO SO ADORABLE. A lot of work, these owls were, but totally worth it.


Remember, you may want to start making regular ol' cake balls or cake pops before jumping into these fancy-schmancy creatures. Warning: This is an all day project. But if you are up for the challenge...then you'll love the outcome.


You have to shape the cake balls more into cake ovals. After they are in the freezer for 15 minutes you can attach chocolate chips (using melted chocolate as glue) on top to form the pointy ears. 

 Once they set you dip it all into melted chocolate, drip off excess, and let them dry in cake pop stand.


Attach eyes, hands/claws, feet/talons, and nose. The eyes are white candy necklace pieces. I went to three different stores and couldn't find them. But luckily I have an amazing husband who found them at Stauffer's for me. :-) 


I was getting desperate and was worried we wouldn't find any so I experimented with cheerios. They weren't too bad :-)


The feet are tiny, special flower-like sprinkles in orange or pink.

The claws are brown m&m's, you should try the mini m&m's, they look better (or not attach anything for hands at all).


What do you think? Comments? Suggestions? I would love to know that you visited my blog. Please leave me a message letting me know you were here! Did you try out a recipe? Let me know! I would love to hear from you :-)

Thursday, February 17, 2011

Cake Pops (Bears)

These are pretty cute. I used another snow day to work on these with some fellow teacher friends.


You use M&M's, cut in half, to create the ears. Then heart sprinkles & edible eyes for the rest of the face. 


The edible-ink pens only do so much before drying out and becoming difficult to use. So we used alternative methods. We took leftover vanilla frosting and mixed it with food coloring to create a dark gray/dark blue/black palet. Then we used toothpicks to draw the smiles on. They turned out great!


We ran out of eyes so my poor husband ran around town trying to find them for me. They sell them at AC Moore and Michael's in the candy/cake making isles. But they were off to the side so they are hard to find. He had to go back a second time to actually find them and the sales person he talked to didn't even know what they were. But trust me, they are there. They aren't cheap, but totally worth it. Painting on eyes can be tedious and if you don't have the right size circle sprinkles it's a pain. Plus those edible-ink pens aren't always reliable. 


We didn't have enough brown M&M's so I switched to all-blue bears and then used orange accents for the regular brown bears. I've heard of making these for a baby shower. Blue bears if it's a boy and pink bears if it's a girl.


What do you think? Comments? Suggestions? I would love to know that you visited my blog. Please leave me a message letting me know you were here! Did you try out a recipe? Let me know! I would love to hear from you :-)

Wednesday, February 16, 2011

Cupcake Bites

These are so so so amazing. I think it's because I used the dark chocolate mint melts instead of regular. If you like mint & dark chocolate AND like cake pops then this is the perfect mesh.

You need to make normal cake pop balls like you would for any other recipe. Make them, prepare them, and freeze them first. After they have been shaped and in the freezer for 15 minutes you are ready to move on. You won't need sticks for this.


The trick is to use the candy molds in the shape of peanut butter cups for the base of your cup cake bites. Melt chocolate wafers (I highly recommend the dark chocolate mint if you like the combination of those flavors, look for them at AC Moore or Michael's) according to package directions. You have the option of using the squeeze bottles, any kind will do. But I didn't really like using them. You might have better luck. Just make sure they are FULLY melted. I used a normal glass cup to melt mine in.


Then you spoon/squeeze the melted chocolate into the molds. Don't fill them all the way. Only fill 3/4 of the way. Only do a couple at a time. Because before they dry you must place the cake balls in each mold with the chocolate in it. Once the tray is full place them in the freezer. You may want to use multiple trays at a time to make this go faster.


Wait for them to cool an dry. Pop them out individually. Melt a different color chocolate such as pink or another cut cupcake color. Dip the top of the cupcake, the cake ball, into the melted chocolate holding the cupcake by the chocolate base. Place a red M&M upside down on the top and cover with rainbow sprinkles before the chocolate melts. 


ADORABLE!!!


What do you think? Comments? Suggestions? I would love to know that you visited my blog. Please leave me a message letting me know you were here! Did you try out a recipe? Let me know! I would love to hear from you :-)


Tuesday, February 15, 2011

Aunt Lena's Party Mix

Our family, on my husband's side, is obsessed and I mean OBSESSED with our Aunt Lena's Party Mix. It is a hot commodity for Fisher family gatherings. We will sneak into another room, hide the party mix from others, and devour cup-fulls of the stuff. It is not a party without it. We fight over it. We now have family auctions during Christmas time (instead of doing a traditional gift exchange) and Aunt Lena's Party Mix goes for about $50 a container. It's THAT good. This past year she had to make two containers to auction off plus additional for us to eat there on the spot. We just love love love this party mix. You could drop it on the floor and people would still eat it, it's THAT good. 


We were deciding what to send my brother-in-law Josh, who is away at college, and we thought party mix would be the perfect addition to our package of baked goods. I was so excited to know that my sister-in-law had the recipe in her possession. (I just assumed Aunt Lena NEVER gave the recipe away). I came over last weekend and we whipped up a huge roaster-full of awesome party mix. Don't worry I made sure to save some for myself.


It was an honor and a privilege to be able to make this sacred Aunt Lena Party Mix recipe. Just ask the family, I was pretty excited about it. 


Now, I hate to disappoint my faithful readers but I will not be sharing the recipe with you guys. It's a family secret! There is loyalty here. If you want it, you'll just have to ask Aunt Lena yourself. 


What do you think? Comments? Suggestions? I would love to know that you visited my blog. Please leave me a message letting me know you were here! Did you try out a recipe? Let me know! I would love to hear from you :-)


Related Posts Plugin for WordPress, Blogger...