Pages

Thursday, March 17, 2011

Hot Couscous For Breakfast

This was surprisingly good. It was also easy to make. Not too many ingredients needed. I already had the all the ingredients in my cupboard, including the couscous. So major bonus points if you don't have to run out to the store and pick up any supplies. I made a batch of this over the weekend and then portioned it out for breakfast all week. I hear this is a great meal for a camping trips.  


It may be unusual to think of eating couscous for breakfast. For some, eating couscous in general might be out of their comfort zone. But honestly, this meal smells & tastes JUST like cinnamon oatmeal. So if you like oatmeal, you'll like couscous for breakfast! Who knew?


Ingredients:
3 cups skim milk
2 tbsp honey
3 tsp ground cinnamon
2 cups dry couscous
1/3 cup dried fruit such as craisins or apricots
1/2 cup slivered almonds or chopped walnuts


Directions:
In a small sauce pan over medium-high heat combine milk, honey, and cinnamon.
When it comes to a boil pour in the couscous.
Turn off heat, cover, and let stand for 5 minutes.
Stir in fruit & nuts. Fluff with a fork.


What do you think? Comments? Suggestions? I would love to know that you visited my blog. Please leave me a message letting me know you were here! Did you try out a recipe? Let me know! I would love to hear from you :-)


Wednesday, March 16, 2011

Turkey Meatloaf


I used the ingredients feature on AllRecipes.com to find this recipe. I had an extra package of lean ground turkey and rosemary that I had been using for a couple of recipes. Plus bread crumbs too. I wanted to find a recipe to freeze. I wanted to use this stuff before it went bad. So I just typed in the ingredients I had and it found several recipes for me. I knew that meatloaf was easy to make and it was perfect to freeze. The recipe also used everything I had, so it was more than perfect. I kept this recipe real simple. No tomato-sauce topping, etc. However, I did see one recipe for turkey meatloaf that mixes in fresh spinach. I bet that would be really good. If anyone tries making that let me know how it goes. 


Ingredients:
1 lb to 1.25 pounds of lean ground turkey
2 cups of bread crumbs
1 egg
3 cloves of garlic, minced
1 cup of skim milk
1/4 cup of worcestershire sauce
1/4 cup of vinegar
salt & pepper
2 tbsp of rosemary


Directions:
In a large bowl combine ground turkey, beaten egg, bread crumbs, garlic, milk, & onions.
Add vinegar and worcestershire sauce.
Season with rosemary, salt & pepper.
Press into greased loaf pan. 
Bake in preheated oven at 350 for 1 hour. 


What do you think? Comments? Suggestions? I would love to know that you visited my blog. Please leave me a message letting me know you were here! Did you try out a recipe? Let me know! I would love to hear from you :-)

Mini Chicken Parmesan

I was in the mood to make something Italian for my small group. I know that I enjoy making Chicken Parm, but I needed something that would be easier to make for 14 people. So I wanted something "smaller" or really just simpler. I started doing some research online. I found some really creative ideas out there (google: mini chicken parm) but then finally settled on making Miniature Chicken Parmesans with already cooked chicken nuggets. It was listed as a Fun For Kids recipe but I decided it would be perfect for a group of adults too. It was delicious! Chicken nuggets were on sale @ Darrenkamps so I bought two big bags. Just make sure you have plenty of cheese & sauce and you are good to go. My small group always pitches in and brings stuff to share. We served with a side of multi-colored rotini, plenty of sauces to choose from, garlic bread, & a delicious salad with avocado slices. Then ended the night with an Oreo Torte! YUM!


Here is a recipe that will serve about 8 people.


Ingredients:
1 large bag of frozen chicken nuggets.
1 tbsp olive oil
1/2 cup onion, diced
6 cloves garlic, minced
3 cups of pasta sauce (may need additional for pasta)
1 cup shredded mozzarella cheese
1/4 cup grated parmesan cheese
1 tbsp italian seasoning
1 tsp oregano
2 tbsp of fresh parsley, chopped
pasta, any kind
salt & pepper, if desired


Directions:
Preheat oven and cook nuggets according to directions. (remember to flip halfway through)
Meanwhile, in a large sauce pan, heat oil over medium-high heat.
Stir in onion & garlic and cook until tender. 
Stir in pasta sauce, parsley, and seasonings.
Bring to a boil.
Reduce heat and simmer for 15 minutes.
Meanwhile, cook pasta according to box directions.
Mix parmesan & mozzarella together in a medium bowl.
Top each nugget with a spoonful of pasta sauce.
Spring with cheese mixture.
Return to oven and cook for another 5 to 7 minutes until cheese is bubbly and melted. 
Serve with cooked pasta. Use excess sauce on pasta.


Evelyn is still too young to enjoy mini chicken parm, but some day she will enjoy the food that her Auntie Jilly cooks her  (ok, so i'm not really her Aunt)


Tuesday, March 15, 2011

Mixed Berry French Toast Bake

My friend Nicole sent me this recipe and insisted that I make it. I'm so glad she did! It's a great treat when making breakfast for a group of people. 


Ingredients:
1 loaf of French Bread, cubed -- very small
6 egg whites
3 eggs
2 cups fat free milk
1 tsp sugar
1 tsp ground cinnamon
1 tsp vanilla extract
1/4 tsp salt
1 package frozen unsweetened mixed berries
2 tbsp cold butter
1/3 cup packed brown sugar


Directions:
Place bread cubes in a 13 x 9 baking dish coated with cooking spray.
In a medium bowl combine egg whites, eggs, milk, sugar, cinnamon, vanilla and salt.
Pour over bread. (I suggest fully emerging the bread into the liquid mixture).
Then refrigerate overnight for 8 hours.
The next morning, remove the berries from the freezer 30 minutes before baking and set aside.
Also remove the baking dish from the fridge.
Bake, covered, at 350 degrees for 30 minutes. 
In a small bowl, cut butter into brown sugar until crumbly. 
Sprinkle butter mixture over French toast. Top with berries.
Bake, uncovered, for 15 to 25 minutes.


If you want more details and tips for this recipe see Nicole's blog.


What do you think? Comments? Suggestions? I would love to know that you visited my blog. Please leave me a message letting me know you were here! Did you try out a recipe? Let me know! I would love to hear from you :-)

Monday, March 14, 2011

Three-Cheese Kielbasa Bake

This is one of my new favorite dishes to make! (Another great selection from Taste of Home's Freezer Pleasers!)


Ingredients:
12 to 20 oz of uncooked elbow macaroni or mini penne pasta
2 pounds of polska kielbasa (I used turkey polska kielbasa)
1 tbsp of olive oil
1 cup onions, diced
1 large zucchini, quartered & sliced
1 cup of diced or shredded carrots
4 cloves of minced garlic
1 jar (24 oz) spaghetti sauce
1 large can (28 oz.) stewed tomatoes
1 egg, beaten
2 containers (15 oz) of fat free ricotta cheese
1.25 cups shredded cheddar cheese
2 cups part-skim mozzarella cheese, shredded
8 green onions, chopped


Directions:
Cook pasta according to box directions
Meanwhile, in the largest skillet you have, brown sausage in oil. (I skipped the oil and used olive oil spray).
Drain, if necessary. You may not have this problem if you are using lean kielbasa.
Add the onions, zucchini, carrots, and garlic. (Admire all the pretty colors).
Stir and simmer for about 10 minutes. Make sure the veggies are crisp-tender.
Stir in spaghetti sauce and tomatoes.
Bring to a boil. 
Reduce heat and simmer uncovered for 15 to 20 minutes.
Meanwhile, drain the pasta.
In each of two greased 13 x 9 baking dishes. Layer the pasta, the meat mixture, the ricotta cheese mixture, and shredded cheese.
Repeat layers and top with green onions.
Cover and bake the casserole at 350 for 15 minutes.
Then uncover and bake for an additional 15 minutes.
You can freeze one of the dishes and cook the other. Or you can freeze them both.


If you choose to freeze...thaw in the fridge for 24 hours. 
Remove from fridge 30 minutes before cooking. 
Cover and bake at 350 degrees for 35 to 40 minutes.


What do you think? Comments? Suggestions? I would love to know that you visited my blog. Please leave me a message letting me know you were here! Did you try out a recipe? Let me know! I would love to hear from you :-)


Sunday, March 13, 2011

Broccoli Chicken Stuffing Casserole

I'm excited to be part of a ministry at church that provides meals for the We Care Food Pantry. Families that are able to get food from the food pantry twice a month also receive a homemade frozen casserole to bring home. We also provide casseroles for the pastors to take with them when they go into a home to visit a family in grief. 


It's really fun. We get together once a month and mass produce casseroles. The first month I wasn't able to attend but we used my recipe for shepherds pie.


This past month we did a broccoli chicken stuffing casserole. Once the chicken was cooked it was easy to do the rest. We did sort of an assembly line system so we could make the 50+ casseroles. I got to take one home with me to sample. It was delicious.


If you are interested in supporting this worthy cause you can make checks out to The Worship Center and designate the money for The Casserole Ministry. You can also donate online


Ingredients:
3/4 pound cubed chicken, cooked in oven
3 cups of frozen broccoli florets
2 cups shredded cheddar cheese
1 6 oz. package of stuffing (any kind)
1/2 can of condensed cream of chicken soup
1/2 cup of mayonnaise
1/2 cup of chicken broth (or any combination of soup, mayo, & broth--enough that the stuffing is moist)


Directions:
Mix soup, mayo, & broth in a medium sized bowl.
Pour stuffing into 13 x 9 casserole dish.
Top with liquid mixture and mix together so it is completely moistened.
Top with chicken, broccoli, and cheese.
Stir well.
Bake in oven at 350 degrees for 30 to 40 minutes.


What do you think? Comments? Suggestions? I would love to know that you visited my blog. Please leave me a message letting me know you were here! Did you try out a recipe? Let me know! I would love to hear from you :-)


Saturday, March 12, 2011

Cauliflower & Chicken Sausage Casserole


This is an easy & healthy recipe. I would highly recommend it if you are in the mood for something different but don't want to work too hard. I received this recipe from my mother via another blog. It was elected BEST HEALTHY CASSEROLE by The Kitchn. It's a great blog because they have everything from home decor, do-it-yourself projects, and product reviews. The pictures are beautiful and the ideas are creative. But I will say I like my cake pops better than theirs ;-) (is that wrong to say?). 


Back to what's important. The secret to the healthy in this casserole is to use chicken sausage instead of regular sausage. I however, chose spicy italian sausage and skipped out on the olive oil to save calories/fat that way. I found a new love for italian sausage after making my two-crust pizza casserole and it was on sale so I went with it. Because of this choice the casserole is still pretty high in fat. So if you are concerned I would stick with the chicken sausage or find an alternative meat/protein for this dish.


I'm sure any type of sausage would make this dish delicious. It's a great way to sneak in vegetables; tomatoes, onions, & lots of cauliflower. You only use a little bit of parmesan cheese so that helps keep the calories down as well. And even though it's healthy...Schmuffin still wanted a bite. :-) I've included nutritional information on the bottom of this post.


Ingredients:
1 medium head of cauliflower
1 lb of chicken sausage or italian sausage, cut and removed from casings (optional)
3/4 cup of diced onion
6 cloves of garlic, diced
1 tsp of thyme
1 28 oz can of whole peeled tomatoes
2/3 cup bread crumbs
1/2 cup of grated parmesan cheese
salt & pepper to taste


Directions:
Preheat oven to 350 degrees.
Bring 3 quarts of water and salt to a boil.
Meanwhile, chop up cauliflower into smaller bite-size florets, removing leaves & stems. I'm no expert at cutting up cauliflower (just kind of making it up as I go) but I would recommend using a video from google for something like this or any other specific cooking tips. But that's only if you don't know what you are doing. (which is usually how I operate)
When water starts boiling add cauliflower and cook for 2 minutes.
Remove from heat and pour into colander in sink.
Rinse immediately with cold water to stop the cooking process.
Meanwhile, in a non-stick pan, cook sausage for about 8 minutes until crispy and brown over medium heat.
You can choose to drain the grease. The original recipe says to leave 1 or 2 tbsp. I didn't have much so I didn't drain it.
Add onions, garlic, and thyme and stir in.
Cook for another 5 minutes.
Then add whole tomatoes from the can with liquid. 
Smash and break up the whole tomatoes. Bring to a boil, then lower heat.
Let cook for an additional 5 minutes. 
Add salt & pepper to taste.
Add meat/sauce to original pot with the cauliflower.
Pour into greased 13 x 9 casserole dish.
Sprinkle bread crumbs & parmesan over dish.
Bake in oven for 25 minutes.


Servings: 6      Calories: 370      Fat: 23.7      Points: 8.5      Points Plus: 10

What do you think? Comments? Suggestions? I would love to know that you visited my blog. Please leave me a message letting me know you were here! Did you try out a recipe? Let me know! I would love to hear from you :-)


Spinach Dip

It's official. I actually know how to cook. This point was confirmed for me last month when I started perfecting the art of going "off road" with my recipes. I used to be the type that stuck exactly to the recipe because I was scared of messing it up. Now I just throw in random ingredients that I think will work and I've been impressed with the results.


I made spinach dip for the super bowl party (to compliment the burrito bar) and I got a lot of compliments on it, so it must have been good. I started by finding hot spinach dip recipes online then I started throwing in things I had in my fridge that would go well with it. 


Ingredients:
10 oz frozen chopped spinach, thawed and dried out
1/2 cup light sour cream
1/4 cup light mayo
1/3 cup pecorino romano
2 laughing cow swiss cheese wedges, chopped & melted
1 can of cream of broccoli condensed soup
8 green onions, chopped
4 cloves garlic, minced
1 cup shredded part skim mozzarella cheese
pepper to taste


Directions:
Preheat oven to 375 degrees
Combine all the ingredients in a medium bowl.
Place in an oven safe dish and bake for 20 to 25 minutes.
Make sure cheese is melted and serve with pretzel things. 


What do you think? Comments? Suggestions? I would love to know that you visited my blog. Please leave me a message letting me know you were here! Did you try out a recipe? Let me know! I would love to hear from you :-)


Friday, March 11, 2011

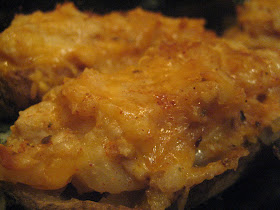
Twice-Baked Taco Potatoes

These came out so well, I'm so proud!


My mother sent me this recipe she found a couple weeks ago and we were having people over, so it was the perfect opportunity to try them out. Most people love mashed-potatoes and most people love tacos. Put them together to create a masterpiece!

I had a lot of commitments on Thursday night, so I prepared them on Wednesday and had my husband bake them in the oven for 30 minutes just in time for our dinner guests. I know you can freeze twice-baked potatoes so you can try doing that too. Enjoy!


Each potato can serve 2 people, or 1 if you are hungry. I was on a time crunch so I used the microwaveable potatoes (aren't all potatoes microwaveable?). They worked like a dream. I would highly recommend them. They would work better for small amounts though. If you are only making for 4 people then they are definitely the way to go. You have to bake them for 8 minutes or if doing several at a time you would bake them for 5 to 6 minutes per potato. If you are baking 10 potatoes that comes out to be an hour (I did it in shifts though), which means you might as well bake them in the oven. But if you are just using a few potatoes it will save you an hour. It also will save you from having to wash and scrub the potatoes because they come cleaned and packaged. You actual cook them while still in the packaging. It may be cheating, but I'm all about it. 


Ingredients:
10 potatoes
1.5 cups sour cream, reduced fat
2 cups skim milk
2 cups cheddar or mexican blend shredded cheese, reduced fat
2 cups mozzarella cheese, reduced fat
1 pound ground beef or ground turkey
1/2 cup taco seasoning
salt & pepper to taste


Directions:
Preheat oven to 375 degrees and bake potatoes for an hour to an hour and a half. 
Or follow microwave instructions if you use those type of potatoes.
Meanwhile, brown beef/turkey and season with taco seasoning. Set aside.
Let them cool and cut out the potatoes using a knife and fork (or whatever other strategy you use for mashed potatoes) away from the skin.
Do not get too close to the skin. You want them sturdy enough to hold further ingredients.
Mash the potatoes with the sour cream and milk using a mixer. Add more milk, butter, salt, etc. if desired.
Stir in cheddar cheese and taco meat. 
Season potatoes with salt & pepper.
Spoon filling into potato skins. 
Sprinkle with additional taco seasoning and mozzarella cheese
Bake in oven for 20 to 25 minutes.


What do you think? Comments? Suggestions? I would love to know that you visited my blog. Please leave me a message letting me know you were here! Did you try out a recipe? Let me know! I would love to hear from you :-)


Thursday, March 10, 2011

Burrito Bar

I know that the super bowl was over a month ago, but we had a great night (my brother-in-law is a devoted Packers fan) and a delicious spread of food. My husband had the brilliant idea of doing a Qdoba-Style Burrito Bar (complete with queso sauce) for dinner. It makes life easier for me because I don't have to cook everything. Plus it keeps the cost down because everyone brings an ingredient that they would put in their burrito/taco and we share. Because there are so many options you can make your burrito as healthy or unhealthy as you want. The secret is to use tinfoil to wrap up your burrito and not make such a mess.


Here are some of the things we had:
chicken/steak/beef (cooked in taco seasoning)
grilled peppers
shredded lettuce
diced tomatoes
diced onions
green chiles
refried beans
black beans
pinto beans
rice
shredded cheese
guacamole
salsa
sour cream
queso sauce (!!!)


I have this awesome Football Taco Bowl that I used to use back in college and I was able to break it out after 7+ years of retirement (we had a lot of taco parties back in college) and my mother just bought me a triple chafing dish set that we used to keep the meat warm.

Be sure to bring plenty of dips & chips for side dishes. Don't forget the tortillas!


What do you think? Comments? Suggestions? I would love to know that you visited my blog. Please leave me a message letting me know you were here! Did you try out a recipe? Let me know! I would love to hear from you :-)

Wednesday, March 9, 2011

Cream Cheese Igloo & Penguin Olives

The warm weather is coming soon, I can feel it! So I was running out of time to make my cream cheese igloo with olive penguins. We had another gathering for The Union a couple weeks ago and we bought bagels to serve with breakfast. Instead of putting out cream cheese the old-fashion way I was able to try out this creative idea that my mother spotted online. The original recipe is for a cheese ball igloo not just cream cheese. That would be perfect for any winter-time party. I was serving this for breakfast at church so I went with just plain cream cheese. Plus it was easier and I was short on time.


Ingredients:
2 to 3 packs of 8 oz. cream cheese, softened
6 to 8 large whole olives, rinsed
6 to 8 medium whole olives, rinsed
1 carrot
toothpicks


You will need excess cream cheese for the penguins, for the very top layer of the igloo, and also for the entrance-way of the igloo. So if you only use two packs of cream cheese then remember to save some of it for later (at least 1/2 a pack)


Press two packages of light cream cheese in bowl that is lined with plastic wrap. Push down firmly and flip bowl up side down. The cream cheese should come out in dome shape. Place on serving dish.


Take a small amount of the additional cream cheese and mix it in a small food processor to make it softer. Then you will be able to draw lines on the igloo to give it that ice-block effect. With a spatula spread the soft cheese over the top of the cream cheese igloo and use a toothpick to create the block design.


You will then need more cream cheese that was not mixed. Cut into rectangular blocks to that look brick-like. Stack these to create the entrance-way. (See picture). Clean away any extra cream cheese to make it look presentable.


Now it's on to the olive penguins. I could explain it, but really this website does an AMAZING job of spelling it out with great pictures and step by step instructions. This is what I used to make the olive penguins.


I've seen pictures of penguins with red peppers as santa hats or pimentos as scarves. Very cute. The first two penguins were hard to do. But once I got the technique they actually were really easy to make. Keeping them clean was the hardest part.


I made this late at night, kept it in the freezer over night and brought it to church early the next morning. It was a little firm so it might of been better to let it set out for a little while.


What do you think? Comments? Suggestions? I would love to know that you visited my blog. Please leave me a message letting me know you were here! Did you try out a recipe? Let me know! I would love to hear from you :-)


Sunday, March 6, 2011

This Week's Dinner Menu

Last week's Twice-Baked Potatoes were a total hit! Turkey Meatloaf was good too. (Look for those posts later on this week).


Last week was pretty busy. I didn't get around to making the Cauliflower & Chicken Casserole, so I'm going to try this week instead. (Look for a post next week). I also didn't get around to using the Tuna Casserole I have in my freezer so I'll use it this week instead.


I'm excited to try out the Mini Chicken Parmesan tonight with our small group. Three-Cheese Kielabasa Bake I've made before but never posted about it. (Look for those posts soon.)


In the meantime, I've posted about Creamy Chicken Noodles (sorry no pictures) & Roasted Eggplant and Tomato Soup before so you can check out those recipes if you are looking for dinner ideas this week. They are great make-ahead freezer meals! Happy Cooking!


What do you think? Comments? Suggestions? I would love to know that you visited my blog. Please leave me a message letting me know you were here! Did you try out a recipe? Let me know! I would love to hear from you :-)

Friday, March 4, 2011

Valentine's Day Hearts Cake Pop Bears


I know this is late in posting, but this is probably one of my greatest achievements of the year (sort of kidding) so it is worth the wait. Beware, this was A LOT of work.


As all of you faithful readers know my newest OBSESSION is Cake Pops. (I have big plans for March 14th, stay tuned). In February my cooking club had a Sweetheart-Themed Dinner (everyone had to make something red) and I was in charge of the favor. PERFECT opportunity to make cake pops! They took me all Saturday and I only made 20.


I was inspired by Bakerella (of course) but I made a few changes. I used mostly dark chocolate--dark chocolate wafer melts from AC Moore and dark chocolate hershey kisses. I used a funfetti-type cake with Valentine's-themed sprinkles mixed in. (they were on sale at Giant!!!) Then I used chocolate frosting with it. The edible candy eyes are a must. So much easier to use those then paint eyes on with the edible-ink pens. I used brown M&M's for their paws. I ran out so I switched to goobers and raisenets. The secret was to use chocolate chips, but not just any chocolate chips, special Ghiradelli chocolate baking chips (they are in the baking aisle). They are bigger and flatter so they are perfect for the bear ears and the protruding nose. SOOOOO CUTE!


The secret is with the conversation hearts. I'll admit conversation hearts don't taste very good. There is a special SweetTart brand that does taste good, but I decided to be cheap. (These candy hearts were donated by my mom.) You can always take the candy hearts off before eating. It's more about the presentation. You have to use the LARGE candy hearts, not the normal size that come in the individual boxes. 

After forming the cake balls into longer oblong shapes and freezing them, then press the candy hearts into the bottom half of the "bear's body" to make a little heart imprint. This will give the impression of the bear holding up the hearts in the final product. After this step insert Ghiradelli chips as the ears (use melted chocolate as glue) and an additional chip where the nose would be.

Let dry, dip in chocolate. It needs to be a deep thin cup/dish because the bears are very long compared to a normal cake pop. Quickly now...before the chocolate completely dries press the candy heart into the spot that was previously imprinted. Also attach the hershey kisses as legs and then brown m&m mini's on the nose. You have to work fast to get these all in before it dries. Think about reheating the chocolate after a while.

Once completely dried, individually add the paws & eyes using melted chocolate as glue. Feel free to use the edible pen to add smiles & eyelashes or other features.


SO SO SO CUTE!!! Totally worth the work. Needless to say cooking club enjoyed them.


What do you think? Comments? Suggestions? I would love to know that you visited my blog. Please leave me a message letting me know you were here! Did you try out a recipe? Let me know! I would love to hear from you :-)